
Excel stores dates and times in a helpful format. Dates are stored as integers and times are stored as decimal values that are relative to the 24 hours in a day. Because of this, it’s easy to separate date and time from a cell or column in Excel. In this tutorial, you’ll learn how to separate date and time in Excel using step-by-step methods.
By the end of this tutorial, you’ll have learned the following:
- How to extract a date from a date-time value in Excel
- How to extract a time from a date-time value in Excel
- How to separate date and time in Excel using Flash Fill
Understanding How Excel Stores Dates and Times
Excel has a clever way of storing date and time values. The date portion is stored as an integer value, with January 1, 1900 as the first date. Any date beyond that is incremented by 1. For example:
- January 3, 1900, would be equal to 3
- November 23, 2023, would be 45253
The time part of an Excel date and time variable is a decimal value ranging from 0 through 1, where the value is relative to the 24 hours in a day. For example:
- 5:51 AM is equal to 0.25389
- 10:24 PM is equal to 0.93349
Now that you know how Excel stores dates and times, let’s dive into how to separate dates and times from a date time variable in Excel.
How to Separate a Date in Excel From a DateTime Using INT()
How can you separate the date from date-time in Excel?
To separate a date from a date-time variable in Excel, you can use the Excel INT() function, which removes the time portion from a date. This works by removing the decimal portion of the date, leaving only the date portion.
Excel makes it very simple by using built-in functions to remove the time part of a date-time value. Let’s see how we can use the INT() function to remove the time part of a date-time in Excel using a step-by-step example:
How to Separate a Date in Excel from a Date-Time Value
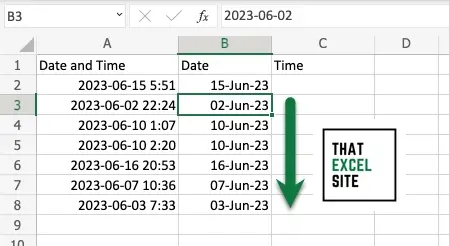
Load your dataset with your date-time values in a column
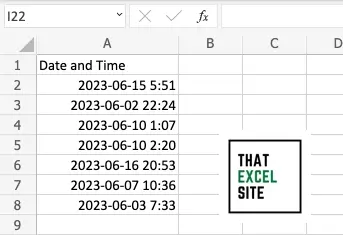
In our sample dataset above, we have a column containing the date-time values. The values are all in June 2023, but contain times from through the day. We’ll want to use this dataset to remove the time from our date-time values.
Use the INT() Function to remove the time
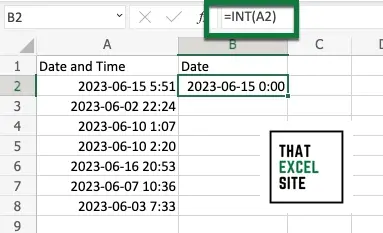
By using the function =INT(A2), we can remove the time portion of a date-time value. This is because dates are stored as the whole values of the date-time value. The INT() function is used to round down any positive number.
Drag the fill handle down to extract the date for each value
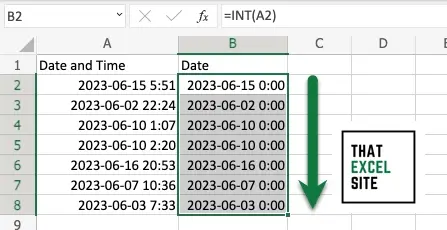
By clicking and dragging the fill handle (the crosshairs at the bottom right of a cell) all the way down to the end of the values, you can separate the date for all values. When you let go of the mouse, Excel will copy the formula down to separate all dates from their date-time values.
In the following section, you’ll learn how to use an alternative method, the TRUNC() function, to separate the date from a date-time in Excel.
How to Separate a Date in Excel From a DateTime Using TRUNC()
The Excel TRUNC() function works by removing any decimal values from a value. This, actually, works very similarly to the INT() function. The main difference is when working with a negative value. In this case, the INT() function would round down, while the TRUNC() function would round down. Since dates will always be positive, this isn’t anything we need to worry about.
Let’s take a look at a step-by-step example of how you can use the TRUNC() function to remove the date from an Excel date-time value.
Step 1: Load the dataset containing date-time values
We’re using the same dataset that we used in the previous section. The dataset contains seven date-time values and we’ll use it to extract only the date portion.
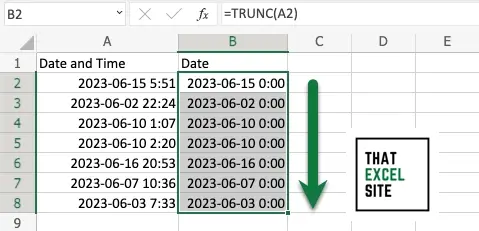
Step 2: Use the TRUNC() Function to Remove the Time Portion

As the name implies, the TRUNC() function is used to truncate a value. It does this by truncating out any decimal portion. Because of this, it essentially rounds a positive value down to its integer value. This, then, in Excel leaves only the date portion.
Step 3: Use the Fill Handle to Remove the Time from all Values
We can then drag down the fill handle to apply this function to all of the values in the range. When we let go of the mouse, Excel will extract only the dates from the date-time values.
In the following section, you’ll learn how to separate only the time from a date-time value in Excel.
How to Separate a Time in Excel From a DateTime Using INT()
How can you separate a time from a date-time value in Excel?
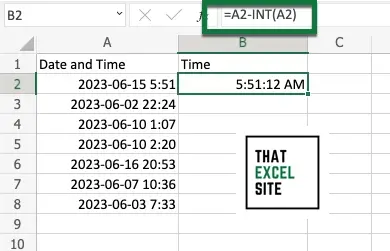
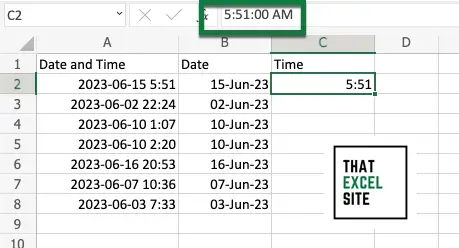
The easiest way to extract the time value from a date-time value in Excel is to use the formula: A2-INT(A2). This removes the integer value from the date-time value, leaving only the time value.
In this section, you’ll learn how to separate a time from a date-time value in Excel. We’ll use the INT() function again, but we’ll use it a bit more creatively. Since the time portion of a date-time value in Excel is the decimal portion of the number, we can use a simple function to get only the time portion. Let’s take a look at the formula first:
=A2-INT(A2)Now that you have a sense of the formula we’ll be using, let’s take a look at a step-by-step example.
Step 1: Load Your Dataset Containing Date-Time Values
In this example, we’ll again use the same dataset we used in the example above. The dataset contains seven different date-time values that we’ll use to only separate out the time value.
Step 2: Subtract the Integer Value From Our Date-Time Value
In order to extract the time value from the date-time value, we can subtract the whole value from it. In order to do this, we use the formula =A2-INT(A2) which leaves only the decimal portion. Since the decimal portion is the time value, we’re left with only the time.
Step 3: Use the Fill Handle to Extract All the Times in Excel
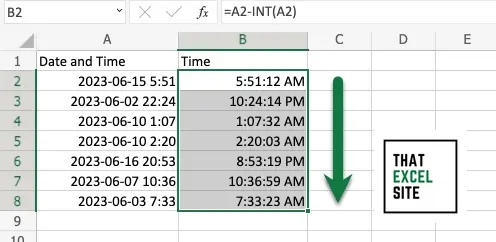
In order to get all of the time values for date-time values, you can drag down the fill handle. When you let go of the mouse, the formula is copied down and extracts all of the time values from the date-time values.
How to Separate Date and Time in Excel Using Flash Fill
In this final section, you’ll learn how to use the Flash Fill feature in Excel. The feature figures out the pattern of what you’re trying to accomplish to reproduce for each cell. Let’s see how we can use the Flash Fill feature to separate the date and time from a date-time value. We’ll use the same dataset we’ve been using all along to see how this works.
Step 1: Load your date-time values in an Excel column
In this example, we’ll again use the same dataset we used in the example above. The dataset contains seven different date-time values that we’ll use to only separate out the time value.
Step 2: Enter the date you want to get from a column
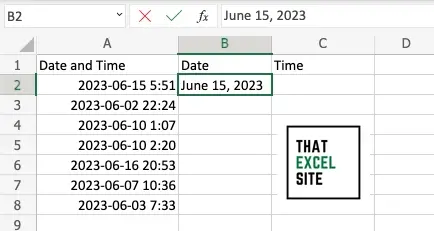
Rather than using a function to get just the date, enter the date value into cell B2. In this case, that’s “June 15, 2023”.
Step 3: Use Flash Fill To Extract Dates for an Entire Column
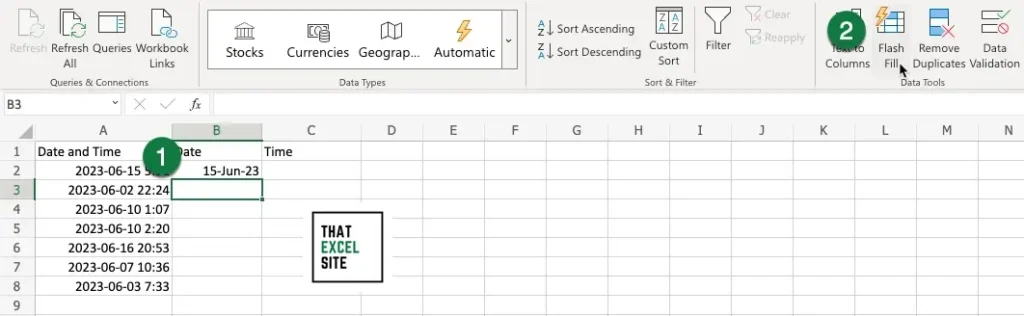
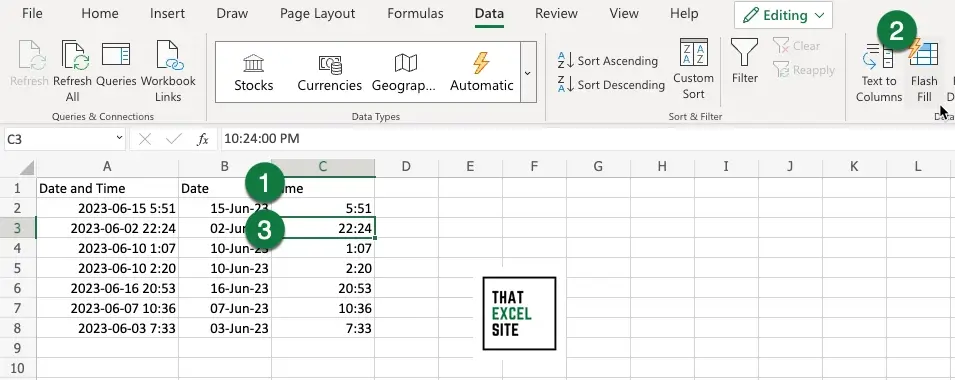
Move onto the cell below the one you entered the date into. Then, in the Data tab, select Flash Fill.
Step 4: Excel Flash Fills the Dates from Each date-time Value
When you click the Flash Fill button, Excel will auto-fill all of the dates. Since we’re not using a formula to calculate this, Excel hardcodes the values directly.
Step 5: Enter the Time Into Cell C2
Similar to what we did for the date, enter the time directly into cell C2. Excel interprets this as a time value and converts it to a time data type.
Step 6: Use Flash Fill to Extract Times from a Column of date-time Values
Click on the following cell, then select the Flash Fill feature. Excel will then extract all of the times from the column automatically.
Conclusion
In this tutorial, you learned how to use Excel to separate the date and time from a date-time value. Being able to work with dates and times can seem daunting at first. However, because Excel uses a clever way to store date-time values, working with them is a surprisingly fun experience! You first learned how to use the INT() and TRUNC() functions to extract only the date from a date-time value. Then, you learned how to use Excel to separate out only the time portion of a date-time value. Finally, you learned how to use the Excel Flash Fill feature to extract dates and times from a date-time value.
Additional Resources
To learn more about related topics, check out the tutorials below: